.png)
Discover how to create engaging mobile app demos on your computer in no time. Learn how Demoboost can help you easily upload screenshots, share, and deliver demos on your browser. Enhance your mobile app experience with interactive product demos that captivate your prospects and showcase your app’s full potential.
With Demoboost, you can demo your mobile app alongside your web app demos from a unified platform designed specifically for demoing. Create and streamline your mobile app demos in under in no time. Set up your mobile demo once and empower your entire revenue teams to showcase your app effortlessly.
You can create mobile app demos in three different methods with Demboost:
- Demos using static screenshots
- Demos using scrollable screenshots
- HTML-based app demos
👉 If you want a jump start and save time, check out Demoboost’s mobile app demos right away.
3 Easy ways to create mobile app demos using Demoboost
Approach 1: Create app demos with static screenshots
1. Upload mobile app screenshots to Demoboost
- Open the Demoboost platform and log in to your account.
- Click on the upload button and select the screenshots of your mobile app from your device.
- Ensure the images are clear and high-quality for the best user experience.
2. Add guides
- Choose the uploaded screenshot where you want to add a product tour guide.
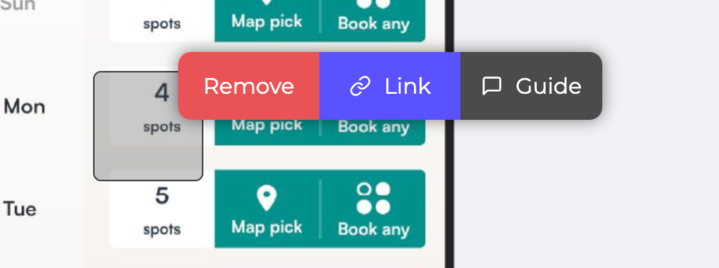
- Click on the specific area of the screenshot where you want to create a guide or hotspot. This will open a menu with options.
- With this, you can create interactive clickable elements that can link to other functions of your app or provide additional information.

3. Configure your demo
- There are two options available with Demoboost - Link and Guide.
- The ‘Link’ option will make the buttons interactive and clickable. When clicked, they will act the same as they would do in your actual mobile app. With Linking, you can create a user flow (similar to a replica of your real app) - by stitching multiple screenshots sequentially.
- If you choose the “Guide” option, you can add a step-by-step guide or additional information that will appear when the guide is clicked.
- You can move and resize the hotspots to fit the design and ensure they are placed accurately on the interface elements.

4. Save and Preview
- After configuring the guides, save your changes.
- Use the preview function to see how the interactive screenshot looks and behaves. Ensure all guide flows are working correctly and display the options as intended.
Here’s a real-life example of how teams use Demoboost to create mobile app demos with static screenshots:
Approach 2: Creating demos with scrollable screenshots
1. Upload scrollable screenshots
- Scrollable screenshots provide a more dynamic and engaging user experience, simulating the actual use of the mobile app.
- Follow the same steps as in Approach 1 to upload your mobile app screenshots.
- Make sure the screenshots are scrollable to enhance interactivity. This can be done by capturing long screenshots or stitching multiple screenshots together.
Here’s a complete guide on how to take a scrollable screenshot on your mobile device:
👉 iOS → https://www.youtube.com/watch?v=4ulY8EjtV58
👉 Android → https://www.youtube.com/watch?v=L3XDbA1ZqhQ
* iOS version should be 15 or higher
* Android version should be 13 or higher
2. Add hotspots and guides
- Add guides to the scrollable screenshots as described in Approach 1.
- This will allow users to interact with different parts of the screenshot as they scroll.
3. Save and Preview
- Save your changes after adding hotspots and guides.
- Preview the interactive, scrollable screenshot to ensure it functions correctly and provides a seamless user experience.
Here’s a real-life example of how teams use Demoboost to create mobile app demos with scrollable screenshots:
Approach 3: Transforming mobile app into HTML screens for demos
1. Upload HTML screens
- Upload the HTML screens to Demoboost just like you would with images or videos.
- Because these are HTML screens, they will be editable within Demoboost
- This allows for real-time customisation and personalisation of your demo.
2. Add guides to your demo
- Add hotspots and guides to the HTML screens as described in Approach 1.
- HTML screens allow for more complex interactions and can be tailored to specific user needs.
- Since these are HTML screens, you can edit and personalise the demo directly within Demoboost WITHOUT needing any coding skills.
- This is ideal for creating tailored demos for different audiences.
3. Save and Preview
- Save your changes after adding hotspots and guides.
- Preview the interactive HTML screens to ensure everything works as expected and provides a high-quality user experience.
Here’s a real-life example of how teams use Demoboost to create mobile app demos with HTML:
📝 The key advantage of HTML demos is that you can create complex yet personalised mobile demos. For example - if you want your prospects to perform complex actions (say, scrolling right to know more about a feature) or personalise it based on a specific use case to draw their attention → HTML-based mobile app demos are the way to go.
By following these detailed steps, you can create a highly interactive and personalised demo of your mobile app using Demoboost-whether you’re working with static images, scrollable screenshots, or HTML screens.
This will help you showcase your mobile app effectively and engage your audience with interactive elements.
If you need more help, contact our mobile demo experts and we’ll reach back to you shortly.

![How to Demo Mobile Apps on Your Computer [3 Simple Steps]](https://cdn.prod.website-files.com/65422a1e221ec459a78f0dbe/66f183f3001e599e26f48aab_How%20to%20Demo%20Mobile%20Apps%20on%20Your%20Computer%20%5B3%20Easy%20Steps%5D.webp)
.png)
.png)
